Submitted by macelee on 2013-02-11 14:10; Last upda
ted on: 2018-11-17 17:34

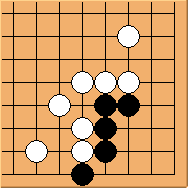
Diagram 26.1: White to play
Submitted by macelee on 2013-02-10 16:44; Last upda
ted on: 2018-11-17 17:32

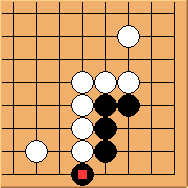
Diagram 25.1: White to play
Submitted by macelee on 2013-01-22 20:47; Last upda
ted on: 2018-11-17 16:55

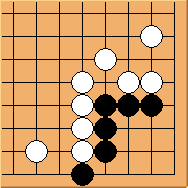
Diagram 10.1: White to play
Black has no external liberties but hanes at both sides. Can white do anything?
Submitted by macelee on 2013-01-20 21:35; Last upda
ted on: 2018-11-17 16:52

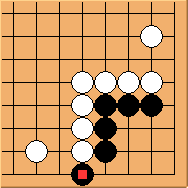
Diagram 9.1: White to play
We will now consider the Carpenter's corner with one extra liberty as well as one first-line stone.
Submitted by macelee on 2013-01-19 06:47; Last upda
ted on: 2018-11-17 16:40

Diagram 7.1: White to play
Black has one extra stone at  . Does it help?