All you need to know about Carpenter's Square - 25
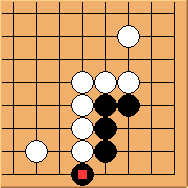
Diagram 25.1: White to play
The first-line hane  also makes a lot of difference. What's the best strategy for white?
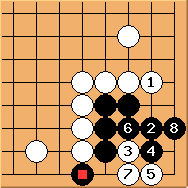
Diagram 25.2: White fails
First of all, white cannot use the easy option  as in Shape 24. This is because thanks to black has the leisure to play key point
  .
.  can also play at directly. In both cases the corner is unconditionally alive.
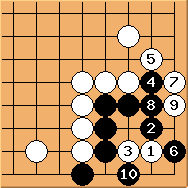
Diagram 25.3: White fails
doesn't work either, resulting in a seki. If  plays
plays  instead, it is also a seki.
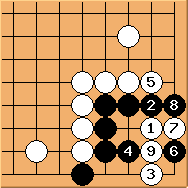
Diagram 25.4:
 possible?
It may appear that tesuji and the sequence in Diagram 23.9 still work in this shape. But here is incorrect.
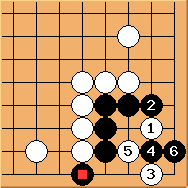
Diagram 25.5: White fails
is a tesuji we've seen before (e.g. Diagram 5.2). Because of ,  is now possible.
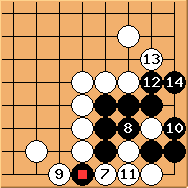
Diagram 25.6: White fails
 wants to start a ko. But even if black cannot win the ko fight, there is still sufficient room to make two eyes.
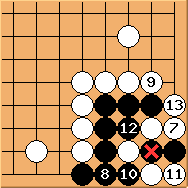
Diagram 25.7: White fails (14=*bx*)
here would result in a 'connect-and-die' situation and black is unconditionally alive again.
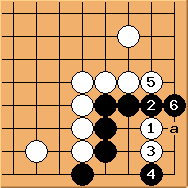
Diagram 25.8: Solution
is the last option for white. This move always works in Shape 23, but we did not discuss it in details because the outcome would be inferior to the solution. Clearly is the key point. After  / exchange, white has three options. Note that cannot play at 'a'.

Diagram 25.9: Solution 1
here ends up in an approach ko favourable for black - white needs an extra move at 'a' to make it a directly ko, which is much much worse for white in Shape 23 but acceptable in this shape.
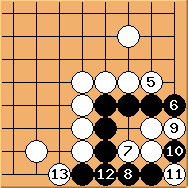
Diagram 25.10: Solution 2 (14=10)
is also possible and is a tesuji. After  this again results in an approach ko favourable to black. Note that if black doesn't start the ko at right away, white has the option to make the corner a seki by playing .
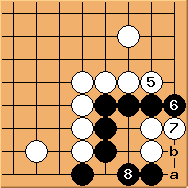
Diagram 25.11: Solution 3
here is another option. Later white has the option to make a 10000-year ko at 'a' or seki at 'b'.
Conclusion: black corner is quite safe. White can choose to fight an approach ko or a 10000-year ko (which implies a seki). The situation is quite subtle and the outcome is dependent on positions elsewhere.

Comments
Diagram 25.3
If 9 at 10 in Diagram 25.3, isn't it a ko? B must avoid a Bulky Five.