All you need to know about Carpenter's Square - 26
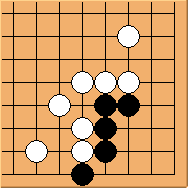
Diagram 26.1: White to play
With one first-line hane and one extra liberty, the chance of killing the corner is really remote. So this shape is all about white knowing possible options and how to negotiate the best settlement in real games.

Diagram 26.2: 10000-year ko
This is similar to Diagram 25.11, which results in a 10000-year ko. White needs 4 extra moves to create a direct ko so unless something really unusual happens (e.g. a double-ko eleswhere) black corner cannot be threatened. On the other hand, it white does not play 'a' immediately to form seki or play 'b' to reduce the external liberty, black has the option to throw in 'a' to start a ko fight. This is actually more like a direct ko from black's perspective - although black is risking the whole corner, by winning this ko only black can kill everything using 'oshi-tsubushi'.
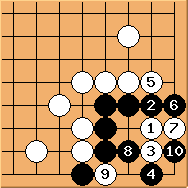
Diagram 26.3: Another option
 is a bit risky but black has this option ......
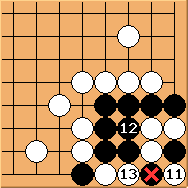
Diagram 26.3: Continued (14=
 )
)To continue ......
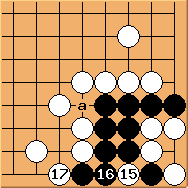
Diagram 26.5: Approach ko
It is now clear the result is an approach ko. Without liberty 'a', this would be a direct ko and too dangerous for black.

Diagram 26.6: Seki
If white has no intention to kill and doesn't want to give black the chance for a ko,  here ensures a seki (we've seen this shape in Diagram 9.11). Note that black doesn't have to play 'a' unless the external liberty is reduced.
Conclusion: white has three options and differences are again very subtle. In pure Life & Death problem solving, Diagram 26.6 is considered a failure. But it could well be the best option in real games.
