Submitted by macelee on 2013-01-24 13:07; Last upda
ted on: 2018-11-17 17:05

Diagram 12.1: White to play
As will be shown, the missing stone at the hoshi point is a major defect for black.
Submitted by macelee on 2013-01-24 06:40; Last upda
ted on: 2018-11-17 16:59

Diagram 11.1: White to play
How does the extra bend at  affect the outcome?
Submitted by macelee on 2013-01-22 20:47; Last upda
ted on: 2018-11-17 16:55

Diagram 10.1: White to play
Black has no external liberties but hanes at both sides. Can white do anything?
Submitted by macelee on 2013-01-20 21:35; Last upda
ted on: 2018-11-17 16:52
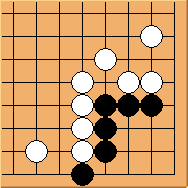
Diagram 9.1: White to play
We will now consider the Carpenter's corner with one extra liberty as well as one first-line stone.
Submitted by macelee on 2013-01-19 21:29; Last upda
ted on: 2018-11-17 16:42
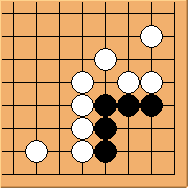
Diagram 8.1: White to play
Submitted by macelee on 2013-01-19 06:47; Last upda
ted on: 2018-11-17 16:40
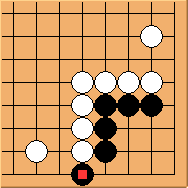
Diagram 7.1: White to play
Black has one extra stone at  . Does it help?
Submitted by macelee on 2013-01-18 21:19; Last upda
ted on: 2013-01-26 06:51
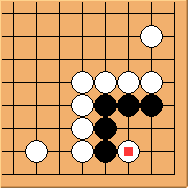
Diagram 6.1: Alternative attack
Submitted by macelee on 2013-01-17 21:39; Last upda
ted on: 2014-05-08 14:01
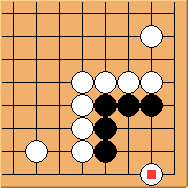
Diagram 5.1: Another tricky move
Submitted by macelee on 2013-01-16 20:12; Last upda
ted on: 2018-11-17 16:23

Diagram 4.1: Tricky move
White has the option to hane from the 1st line. Black needs to be very careful not to get tricked.
Submitted by macelee on 2013-01-15 20:35; Last upda
ted on: 2014-05-08 13:49

Diagram 3.1: White to play
Following the previous article, we will discuss alternative ways for white to attack the corner.
Pages
