All you need to know about Carpenter's Square - 4
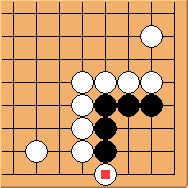
Diagram 4.1: Tricky move
White has the option to hane from the 1st line. Black needs to be very careful not to get tricked.
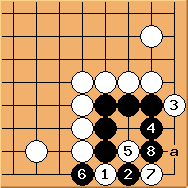
Diagram 4.2: Incorrect way to attack
 looks like common-sense move but is it correct? This solution, ending in a ko, was first published on the Chinese Go magazine Weiqi Tiandi in 1988. The comment says:"
  is good.
  cannot avoid ko fight by connecting at
  - white would play 'a' and kill everything" (indeed this is true as white can either get back home or form an eye in the corner). But even professional writers can sometimes misread the situation.
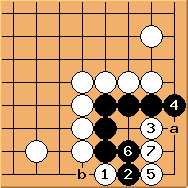
Diagram 4.3: Black fails
 is a good tesuji. As mentioned many times already, black often gets into trouble if allowing white to form an eye in the corner. may try 'a' or
  may try 'b', but white simply makes an eye to win the semeai.
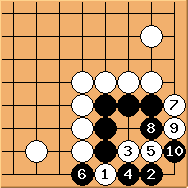
Diagram 4.4: Correct solution for black
is the tesuji to save the corner. If then the remaining are all forcing moves resulting in a ko fight similar to the standard carpenter's square's solution, with one extra exchange of / . This extra exchange would cost white a couple of points if black wins the ko fight, a small punishment for playing the tricky move in the first place.
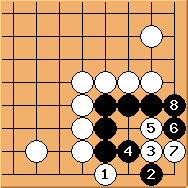
Diagram 4.5: Black survives in seki
doesn't work either and black ends up even better - living in seki. If tries  instead, black still answers , resulting in the same seki.
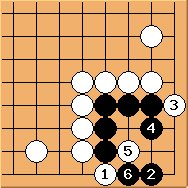
Diagram 4.6: Same as the correct solution above
is the last attempt. is a careful move and recovers to the correct solution above.
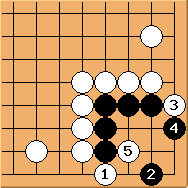
Diagram 4.7: Black is tricked
is wrong and the corner is dead.
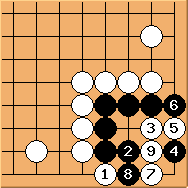
Diagram 4.8: Black fails
Finally, is incorrect.  is a wonderful move to form an eye.
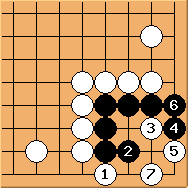
Diagram 4.9: Black fails
If black plays instead, is the wonderful tesuji to kill.
To summarise, is a tricky move. If black responds properly, the best white can expect is a ko fight (Diagram 4.4) which is inferior to the standard one (Diagram 2.2, Shape 2). However, black needs to be very careful to avoid many pitfalls.
